RPG GAME 240x320 Rus Download
240x320 Rus Download 128x160 Rus Download 176x220 Rus Download 240x320 Rus Download 320x240 Rus Download 352x416 Eng Download 240x400 Rus Download 240x432 Rus Download 360x640 Rus Download 360x640 Rus Download 480x800 Rus Download
176x220 Rus Download 240x320 Rus Download 128x128 Rus Download 128x160 Rus Download 176x220 Rus Download 240x320 Rus Download
240x320 Rus Download All Eng Download 128x160 Eng Download 176x208 Rus Download 240x320 Eng Download 240x320 Rus Download 320x240 Eng Download 360x640 Eng Download 480x800 Eng Download
240x320 Rus Download 240x320 Rus Download |
Monday, March 21, 2011
Free Download Rpg Game Mobile
Sunday, March 20, 2011
Servis Code Handphone

Nokia Hasil survey mengatakan bahwa, satu dari tiga ponsel yang ada ternyata tidak
pernah dikunci atau diberikan kode pengaman tertentu. Hal ini menyebabkan banyak sekali kasus kejadian data hilang atau dibuka oleh orang lain tanpa sepengetahuan pengguna oleh orang lain. Untuk melindungi ponsel agar tidak di otak atik orang lain memang diperlukan kode pengaman, tapi masalahnya bagaimana jika kode pengaman tersebut lupa?
Tentu saja sangat merepotkan dan jika kita salah memasukkan kode maka secara otomatis ponsel tidak dapat dipergunakan karena terkunci oleh kode tadi kerusakan seperti ini yang disebut dengan Phone lock.
Jika Anda mengalami masalah seperti ini tidak perlu panik, karena ada beberapa langkah awal yang dapat dilakukan untuk mengatasinya yaitu dengan cara:
Masukkan kode standar yang biasa digunakan yaitu 12345, 1234, 0000. 000000 dan 000000000.
Jika belum berhasil, coba lakukan dengan angka bebas. Anda gak perlu khawatir melakukan kesalahan memasukkan kode kecuali ada tampilan peringatan batas uji cobanya, dari pengalaman biasanya terdapat pada ponsel Siemens.
Khusus untuk ponsel Samsung bisa dilakukan reset EEPROM langsung dengan memasukkan kode *2767*2878# dalam kondisi ponsel hidup tanpa menggunakan simcard. Jika belum berhasil juga maka Anda dapat membawanya ke service center untuk membuka Phone Lock.
Umumnya langkah perbaikan dilakukan dengan cara software, menggunakan Box Repair. Langkah-langkah perbaikan software untuk mengatasi masalah ponsel yang terkunci oleh kode password (Phone Lock) Membuka Phone Lock Nokia DCT-3
- Hubungkan ponsel dengan UFS tornado pada PC
- Pastikan ponsel sudah terkoneksi dengan baik klik menu ‘check’ pada tampilan tornado di PC.
- Pilih DCT 3
- Klik jenis ponsel yang akan di unlock.
- Klik reset user lock 2x
- Lalu klik full factory default 2x
- Tunggu sampai OK
- Klik disconnect Membuka Phone Lock Nokia DCT-4
- Hubungkan ponsel dengan UFS tornado
- Pastikan ponsel sudah terkoneksi dengan baik
- Pilih DCT 4
- Klik ponsel yang akan di unlock
- Klik reset user lock 2x
- Lalu klik full factory default 2x
- Tunggu sampai OK
- Klik disconnect Langkah-langkah inipun dapat Anda lakukan untuk melakukan perbaikan Phone Lock untuk jenis ponsel WD2
_____________________________________
(N-Gage, N- GageQD, 3650, 3660, 6600, 7610, …) dan BB5 (6630, 6680, N70, N90… Philips
1. Reset Ponsel philips Caranya tekan * # 3 3 5 3 * #
2. Mengaktifkan GPRS Kelas B ponsel Philips Caranya tekan * # 7 2 5 2 * #
3. Mengaktifkan GPRS Kelas C ponsel Philips Caranya tekan * # 7 2 2 4 * #
4. Mengaktifkan GPRS Kelas 1 ponsel Philips Caranya tekan * # 7 2 7 1 * #
5. Mengaktifkan GPRS Kelas 4 ponsel Philips Caranya tekan * # 7 2 7 4 * #
6. Mengaktifkan CSD GSM Kelas C ponsel Philips Caranya tekan * # 7 2 2 2 * #
7. Mengaktifkan GPRS Attach ponsel Philips Caranya tekan * # 7 2 7 6 * #
8. Mengaktifkan EFR dan mematikan EFR ponsel Philips Caranya tekan * # 3 3 7 * #
9. Menampilkan kondisi EEPROMP batre dan radio ponsel Philips Caranya tekan * # 3 3 7 7 * #
10. Merubah status GPRS Attach menjadi Attached ponsel Philips Caranya tekan * # 7 2 8 7 * #
11. Merubah status GPRS Attach menjadi Try Attached ponsel Philips Caranya tekan * # 7 2 8 8 * #
12. Menampilkan RSAV ponsel Philips Caranya tekan * # 7 7 2 8 * #
13. Menampilkan KCGPRS ponsel Philips Caranya tekan * # 7 5 2 4 * #
14. Menampilkan SIM Phase ponsel Philips Caranya tekan * # 7 5 6 2 * #
15. Menampilkan POOL MAX ponsel Philips Caranya tekan * # 7 6 2 9 * #
16. Menampilkan Code Bugging dari sleep mode ponsel Philips Caranya tekan * # 7 6 3 2 * #
17. Menampilkan cluster aktif ponsel Philips Caranya tekan * # 7 7 3 3 * #
18. Menampilkan kode cluster ponsel Philips Caranya tekan * # 7 3 4 3 * #
19. Menampilkan isi registrasi software ponsel Philips Caranya tekan * # 7 3 5 2 * #
20. Melakukan setting sms bearer GPRS/GSM ponsel Philips Caranya tekan * # 7 7 6 2 * #
21. Menampilkan info produk ponsel Philips Caranya tekan * # 7 7 6 3 * #
22. Menampilkan versi produk ponsel Philips Caranya tekan * # 7 7 6 6 * #
23. Menampilkan option aksesoris untuk vibrator ponsel Philips Caranya tekan * # 7 3 2 6 * #
24. Melakukan master reset ponsel Philips (simcard dilepas dulu) Caranya tekan * # 7 3 3 7 * #
_____________________________________
NEC CODES :
06 = IMEI
7468658 = SIM INFO
746255 = SIM INFO
7464674 = IMSI
2820 = SW WERSION
79837 = SW + DSP WERSION
49837 ****************
79786 = Checksum
28453 = Build Levev
737425 = SERIAL NUMBER !!!!
73738 -
737247 = Repair History
7463424 = SIMM Diagnostics
284538 = Build Date
84769 = Power ON
497837 = Hysteresis
3643278746 = Enhanced speed
3648658746 = 3 Volt Sim
347722 = Clear Cause
627538 = Market
7320 = Network Lock
4960 = USIM Card Lock
3210 = SP Lock
8140 = Coorporate Lock
5830 = Unlocking Code !!!
6210 = MSISDN – Current
_____________________________________
Sony Ericsson
Berikut ini adalah kunci kode tombol rahasia yang dapat anda jalankan sendiri dengan mengetiknya di keypad ponsel Sony Ericsson.
1. Melihat IMEI (International Mobile Equipment Identity) Caranya tekan * # 0 6 #
2. Merubah bahasa menjadi bahasa inggris / english Caranya tekan * # 0 0 0 0 #
3. Mengunci sim card agar tidak bisa mengganti simcard Caranya tekan < * * < dan untuk membukanya harus mengetahui kode unlock ponsel anda
4. Melihat service menu dan versi software ponsel sony ericsson Caranya tekan > * < < * < *
Catatan :Masukkan kode tanpa spasi
_____________________________________
NOKIA
*#06# :for IMEI
*#92702689# :All Manufacture (Warranty)
*#3370# :Enable EFR (To disable, Type it again. Phone Automatically Restart)
*#0000# :View Software version
*#7780# :Restore factory settings
*#67705646# :Clear LCD Display (Operator Logo)
*#2820# :Bluetooth device address
*#746025625# :SIM lock allowed statue
*#62209526# : Display the MAC address
#pw+1234567890+1# :Show if SIM restrictors.
*#4720# :half rate Codec activation (To disable, Type it again)
*#7370925538# :S-60 (Reset) Default code is 12345
*#3925538# : Delete the contents and code of wallet
*#7328748263373738# :Reset Phone Code. Default code is 12345 Below are some reset codes for various Series 40, 60 and the new Series 80 Communicator series
_____________________________________
(Nokia 9300/9500):
Full Reset: (clears everything off the phone memory!! Be sure to back up your contacts!!): *# 7370#, 12345 and then Yes.
Soft Reset: *#7780#, 12345 and then Yes. (Also works on Nokia S40 phones as a full reset)
*#335738# This deletes the Email, GPRS, MMS settings that cannot be erased via phone options. (Newer Series 40 phones only i.e. 6230(b))
_____________________________________
SAMSUNG
*#1234# :SW Version
*#2222# :HW Version
*#0842# :Vibrator Test
*#0289# :Buzzer Test
*#0228# :Battery Statue
*#0782# :RTC Display
*#0523# :LCD Contrast
*#0377# :NVM error Log
*#5646# :Logo set
*#0778# :SIM Service Table
*#0638# :SIM Network ID
*#0746# :SIM Info
*#076# : Production no
*#2576# :SIM errors Lock Manager
*2767*2878# :EPROM Reset
*2767*3855# :Master Reset
*#2767*63342# :Media Reset
*2767*667# :MMS reset
*2767*927# :WAP Reset If you are Phone will not reset by using those code:
*2767*637#
*2767*688#
#*7337#
*#9998*3323#
*#9998*627837793#
*2767*7822573738# unlock Code
_____________________________________
Samsung SGH-E715 Turn off the phone.
Put a non-accepted SIM Card and turn it on.
Type *#9998*3323#.
Press Exit.
Choose menu #7.
After phone reboots type *0141# and hit the Call button.
Turn off and insert another SIM Card.
Turn on.
The code is 00000000.
_____________________________________
Samsung SGH-M100
Type *#9998*627837793#.
Then type *#9998*737#.
Press >/ [] (Play Stop) until phone shows NCK/SPCK number.
Press Exit.
Type #0111*CODE# (Code is the last 8 digits of the NCK/ SPCK)
_____________________________________
Samsung SGH-S105
Remove SIM Card.
Enter *2767*7822573738# and after phone reboots, enter #0111*00000000#
_____________________________________
Samsung SGH-S307
Turn off the phone.
Put anon-accepted SIM Card and turn it on.
Type *#9998*3323#.
Press Exit.
Choose menu #7.
After phone reboots type *0141# and hit the Call button.
Turn off and insert another SIM Card.
Turn on. The code is 00000000.
_____________________________________
Samsung SGH-X100
Turn off the phone.
Put a non-accepted SIM Card and
turn it on.
Type *#9998*3323#.
Press Exit.
Choose menu #7.
After phone reboots type *0141# and hit the Call button.
Turn off and insert another SIM Card.
Turn on.
The code is 00000000.
_____________________________________
Samsung Universal
TEMPORARY UNLOCK:
Put a non-accepted SIM Card and turn it on.
Type *#9998*3323#.
Press Exit.
You will get a new menu.
Select Malloc Fail.
In newer phones: #*7337#
_____________________________________
LG
2945*#01*# : Secret menu for LG
*#06# :IMEI (ALL)
*#07# :IMEI and SW (LG 510)
*8375# :Software version (LG B1200)
*6861# :Recount cheksum (LG B1200)
1945#*5101# :Simlock menu (LG B1200)
2945#*5101# :Simlock menu (LG 510W, 5200)
2945#*70001# :Simlock menu (LG 7020, 7010)
2947#* :Simlock menu (LG 500, 600) LG-U81XX SPECIAL CODES Code to read phone
version :
- Phone without SIM
- Enter 277634#*# or 47328545454#
- Select â €˜SW Ver.info’ Code to reset phone :
- Phone without SIM
- Enter 277634#*# or 47328545454#
- Select â €˜Factory Resetâ €™ Code to enter UNLOCK
MENU :
- Phone wit SIM inside
- Enter 2945#*88110# Test Menu 8330 : 637664#*#
Test Menu 8180 V10a : 49857465454#
Test Menu 8180 V11a : 492662464663#
Test Menu 8130-8138 : 47328545454#
Test Menu 8110-8120 : 277634#*#
________________________________
Alcatel
IMEI number : *#06#
Software version : *#06#
Net Monitor : 000000*
_____________________________________
Bosch
IMEI Number : *#06#
Dafault Language : *#0000#
Net Monitor : *#3262255*8378#
_____________________________________
Dancall
IMEI number : *#06#
Software version : *#9999#
SIMcard serial number : *#9994#
Information about battery status : *#9990#
Selftest (only Dancall HP2731) :*#9997#
Show version configuration : *#9998#
Net Monitor : *#9993#
_____________________________________
Ericsson 6xx/7xx/8xx
IMEI number : *#06#
Software version : > * < < * < *
Default language : <>
Enter to phone menu without SimCard
– after Wrong PIN press NO : **04*0000*0000*0000#
Information about SIMLOCK : < * * <
_____________________________________
Ericsson A1018S/T10S/T18S/T28S
IMEI number : *#06#
Software version : > * < < * < *
Default language : <>
Enter to phone menu without SimCard
– after Wrong PIN press NO : **04*0000*0000*0000#
Information about SIMLOCK : < * * <
_____________________________________
Hagenuk (Duet)
IMEI number : *#06#
Software version check : ##9140*83#75*2#
_____________________________________
Motorola
IMEI number : *#06#
Net Monitor ON : ***113*1*[OK]
Net Monitor OFF : ***113*1*[OK]*
– press this until box shown up
_____________________________________
Maxon
*#9988# Tetris Play
*#9900# Software Version
*#9911# L1 Debug on/off
*#9916# Text (scroll trough with up/down)
*#9937# Discharging battery
*#9958# Watch stop
*#9959# Watch start
*#9960# Contrast set
*#9917# Lock status
_____________________________________
NOKIA 5110/5120/5130/5190/6110/6120/6130/6150/6190
IMEI number : *#06#
Software version : *#0000#
Simlock info : *#92702689#
Enhanced Full Rate : *3370# [#3370# off]
Half Rate : *4720#
Provider lock status : #pw+1234567890+1
Network lock status : #pw+1234567890+2
Provider lock status : #pw+1234567890+3
SimCard lock status : #pw+1234567890+4
1234567890
– MasterCode which is generated from IMEI
_____________________________________
Nokia 3110
IMEI number: * # 0 6 #
Software version: * # 0 0 0 0 #
or * # 9 9 9 9 # or * # 3 1 1 0 #
Simlock info: * # 9 2 7 0 2 6 8 9
#
Philips
IMEI number: * # 0 6 #
Simlock info: * # 8 3 7 7 #
Security code: * # 1 2 3 4 #
(Fizz) or * # 7 4 8 9 #
Samsung SGH600/2100DB
IMEI number: * # 0 6 #
Software version: * # 9 9 9 9 #
albo * # 0 8 3 7 #
Net Monitor: * # 0 3 2 4 #
Chaning LCD contrast: * # 0 5
2
3 #
Memory info: * # 0 3 7 7 #
albo
* # 0 2 4 6 #
Reset memory (SIMLOCK`a
removing!!!): * 2 7 6 7 * 3 8 5
5#
Reset CUSTOM memory: * 2 7
6
7 * 2 8 7 8 #
Battery state: * # 9 9 9 8 * 2 2
8
#
Alarm beeper: * # 9 9 9 8 * 2 8
9 #
Vibra test: * # 9 9 9 8 * 8 4 2 #
Sagem
IMEI number: * # 0 6 #
Service Menu access: MENU 5
1 1
#
Siemens C25/S25
IMEI number: * # 0 6 #
Software version: put off sim
card and enter: : * # 0 6 # and
press
LONG KEY
Bunus screen: in phone booke:
+ 1 2 0 2 2 2 4 3 1 2 1
Net Monitor (S4 Power): Menu
9
8, left SoftKey, 7 6 8 4 6 6 6,
Red
phone, Menu 5 6
Sony
IMEI number: * # 0 6 #
Software version: * # 8 3 7 7 4
6 6 #
Show list of product creator
names (you must save this
number in
your Phone Book with “own
phone no.” record): + 1 2 0 2
2 2 4 3 1 2
1
Samsung sph-n240, n400,
a460, a500,
Nam Set: ##Spc
Test Mode: 47*869#1235
Debug Menu: ##33284,ok
Service Menu: Menu+8+0
(#889)
Reset (Life time, Clear
Memory,
etc): ##786,ok
A-key: ##2539,ok
Label Selection: ##3882,ok
Label(Home, Work, etc) :
**523,ok
NGG Setting (Gateway, etc.):
##
2769737,ok
Vocoder: ##8626337,ok
CAI Change: ##7738,ok
Enable TTY: ##889,ok
Samsung sch-411, 611, n105,
a100, a300, a2000,
Nam Set: 47*869#08#9
Nam Set: Menu+60
Test Mode: *759#813580
Test Mode: 5809540*45680
A-key: Menu+0, 25##
External Audio: Menu+0, ####
Debug Menu: Menu+8, 0415 or
Spc
Debug Menu: Menu+9, 0415 or
Spc
Brief NAM Programing: Menu
+40,626 (not all version)
LCD Contrast: Menu+45 (not
all
version)
SIO Mode: Menu+49
SIO Mode: Menu+69
Samsung a300, a530, a610,
a620, a660, a670,
Nam Set: Menu, 6, *
Service Menu: Menu, 9, *
Test Mode: 47*68#13580
Samsung X, E, V, S-series
(korean), e250, v420, s250, etc
Nam
Programming:
Nam Set: 6548#0**4#6
Nam Set: 47*869#08#9
Nam Set: 74153697193
Test Mode: 5809540*45680 (88
– efs clear)
Debug Menu: Menu(hold 2sec)
+0, 6725 or 9720 or 1973 or
0415
Debug Menu: Menu+0(hold
2sec), 6725 or 9720 or 1973 or
0415
Samsung N356 (India version)
Test Mode: Menu, 5, down
arrow, *
Test Mode: **00## (in some
flashes)
Samsung i700, etc Nam
Programming:
Nam Set: Go to start and
select
“ PHONE” from the drop
down menu,
dial #83587
Samsung i300,
1. Tap on the Phone Icon with
stylus
2. Press #907*9#0 ENTER LOCK
should appear on screen
3. Enter OTKSL
4. SVC MENU will appear
press 1
5. Enter 10 digit MIN and then
press SAVE
6. Press SAVE again
7. Press 3 and then press SAVE
6
times
8. Enter the HOME SID and
press
SAVE once
9. Press END key twice
TEST MODE COMMANDS
n105_test_mode.txt
a500_test_mode.txt
a530_test_mode.txt
KYOCERA
Qualcomm qcp-800 Nam
Pogramming:
Nam Set: Menu+3+0+Spc
Field Test: Menu+7+0+Fsc
Kyocera 1135, 2255, 3035,
5135, 6035, Se47,
Nam Set: 111111+Jog Dial(Ok),
Select “Programming”+Spc
CAI Change: ##7738,ok
Enable TTY: ##889,ok
Life Timer, PRL, etc: ##786,ok
A-key: ##2539,ok
A-key: 2539,ok
SANYO
Sanyo 4900, 5150, 5300, 8100,
etc Nam Programming:
Nam Set: ##Spc+Ok+Key
Down
+Ok
Advanced Setup: ##3282+Ok
+Key Down+Ok+Msl
A-key: ##2539+Ok+Key Down
+Ok
Version: ##**837+Ok+Key
Down+Ok
Debug Menu: ##FSC+Ok+Key
Down+Ok
Airtime menu: ##8463+Ok
+Key
Down+Ok
Change CAI: ##7738+Ok+Key
Down+Ok
Vocoder: ##8626337+Ok+Key
Down+Ok
Reverse Logistic: ##786+Ok
+Key Down+Ok
Set IP Address: ##2769737+Ok
+Key Down+Ok
TTY On/Off: ##889+Ok+Key
Down+Ok
Ready Link: ##4636+Ok+Key
Down+Ok
Browser Init On/Off: ##
4682+Ok+Key Down+Ok
Picture Token: ##25327+Ok
+Key Down+Ok
Unknown Code: ##5282277+Ok
+Key Down+Ok
(SPC=000000, FSC=040793)
Sanyo scp-A011, smp-A017, etc
Nam Programming:
Nam Set: F9(3 beep) +
0*72696#767
NOKIA
Nokia 3280, 3285, 3580, 3585,
5185, 6185, 8280, etc
Nam Set: *3001#12345#
Software Version: *#837#
Software Version: *#9999#
Esn Number: *#92772689#
Restart Phone: *#75681#
Restart Phone: *#75682#
Nokia 8887
Nam Set: *3001#12345#
Version: *#0000#
Evrc: *#8378#
Esn/Data/Timer: *#92772689#
SID: *#743#
Nokia 8587
Nam Set: *#626#7764726#
A-Key: #8159357022#4579#
(26 digits)
A-Key: #8159357022#4547#
(20 digits)
Version: *#0000#
Version: *#837#
Vocoder: *#3872#
Change language: Menu 5, 3, 1
Change DM mode: *#7678#
debug Screen: *#8378#
Debug: *#8380#
Field Test Menu: *#83788#
SPC Unlock, Factory Reset:
Full Factory Reset: *#7370#
Resets all settings including
non-user changeable items
(like
SPC)
NOKIA
51xx, 61xx, 71xx, 3285, 63xx,
etc:
1) Turn on the phone. Press
*3001#12345#
2) Scroll up to where it says
“ Field Test” and choose
SELECT
3) Highlight “Enable” and
choose OK. Turn the phone off
then back on.
4) If the test mode screen
does
not show up press MENU and
scroll
down to “Field Test” choose
SELECT. Press 0 1 then choose
OK.
5) Lower left or upper left
number is the signal strength.
6) To turn off the test mode
press MENU and scroll down
to
where it
says
“ Field Test” choose SELECT.
Press 0 0 and then choose OK.
3360, 6360:
1) Turn on the phone. Press
*3001#12345#
2) Scroll up to where it says
“ Field Test” and choose
SELECT
3) Highlight “Enable” and
choose OK. Turn the phone off
then back on.
4) If the test mode screen
does
not show up press MENU and
scroll
down to “Field Test” choose
SELECT. Press 2 1 0 1 then
choose OK.
5) Lower left or upper left
number is the signal strength.
6) To turn off the test mode
press MENU and scroll down
to
where it
says
“ Field Test” choose SELECT.
Press 2 1 0 0 and then choose
OK.
AUDIOX
Audiovox 4000, 9000, 9100,
9155, 9500, etc Nam
Programming:
(Power the phone on and wait
until the little light on top
goes
out)
Nam Set: 289+fcn+#+1
Service menu: fcn+00+fsc
(000000)
Test Mode: Hold (2,*,Rcl)
+Power
Test Mode Commands:
99 – download – flash phone
124 – inam data write
125 – version
126 – esn read
127 – sec_code
128 – lock_code
129 – is WFTV data write
137 – FSC code
138 – NPcode (nam program
code)
139 – dscode
141 – restart
218 – Read_Addr
000 – is cdma mode
001 – is fm mode
002 – is pcs mode
008 – is reg read addr
020 – is lna_range
Audiovox pcx-3500xl
Nam Set: ##2726+Send
+1998+1+Spc+1
Audiovox cdm-100, 130, 135,
8300, 8500, 8600,
Nam Set: ##20022002+Pwr
+1+Spc
Audiovox 8610, 8910, etc Nam
programming:
Name Set: ##847446, end,
111111
Audiovox-107 Nam
Programming:
Nam Set: 45680*47*869#1
Audiovox CMP-3 Nam
Programming:
Nam Set: 45680*47*869#1
Dm Mode: Menu, 6, 6
Audiovox 9950 Nam
Programming:
Nam Set: ##3282
Audiovox Z800 (Audiovox 7900,
Sharp) Nam Programming:
Nam Set: m + # + envelope
key
+ * + 1
Audiovox Thera (Toshiba 2032)
Nam Programming:
Thera Nam Programming User
Manual – nam_thera.pdf
AUDIOVOX
9100, 9155:
1) Turn on the phone. As soon
the phone comes on and the
green light
turns off press RIGHTARROW,
0,
0. The phone will ask for the
“ FSC Code”, press 000000
then choose OK and press
RIGHTARROW,
RIGHTARROW. Your phone is
now in test mode.
2) The signal strength is the
number on the top right hand
side of
the screen.
3) To turn off test mode shut
of
the phone and then turn it
back
on.
MOTOROLA
Motorola 7760, 7860, 2260,
8160, etc Nam Programming:
Nam Set: Fcn,0000000000000,
Rcl
Nam Set: 74663#, Fcn, Fcn
Test Mode: Fcn, 00**83786633,
St
Motorola v60c, v120c etc Nam
Programming:
Nam Set: 74663#, Menu,
Menu,
Spc
Nam Set: Menu, 073887, *
(type
quickly)
Test Mode: Menu, 073887*, Spc
Debug Mode: ##33284
Force the phone into DIGITAL
ONLY mode:
1) ##33284 (Debug)
2) RIGHT Softkey (Next) Twice
3) Down arrow 10 times to
“ PrefMod”
4) RIGHT Softkey (Change)
until
you see “DigOnly”
5) LEFT softkey (Exit)
6) MENU then LEFT Softkey
return to idle screen
7) ##33284 (The last 4 will not
display if you have done it
correctly)
Motorola t182, c210, :
Nam Set: ##1111 end
Nam Set: ##298645665 end
Short Nam: ##073887 sto
Motorola v710, v730, v740,
ms150 ,:
Nam Set: 8378*# + press 3
times NATE (spc – 071082)
Test Mode: Menu, 073887*, Spc
Service Menu: #758353266#
646#
Motorola StarTac 2004
Nam Set: 5759789*#, rec key
(3)times (spc – 915037)
Motorola ms200, ms230, etc
Nam Programming:
Nam Set: 5759789*# (spc –
915037)
Motorola v6060 Nam
Programming:
Nam Set:147*369#456*0#
MOTOROLA
v60, c120, c331, etc:
1) Turn on the phone. Press
MENU 0 7 3 8 8 7 *
2) The phone will require you
to
“ Enter a Security Code”,
press
000000, OK
3) Scroll down to “Test
mode” choose SELECT. Scroll
down to “Enable”
choose SELECT. Your phone is
now in test mode.
4) Signal strength is the 3_rd
number down on the left hand
side of
the screen.
5) To toggle between regular
mode and test mode: Press
MODE then
quickly press the BUTTON
DIRECTLY TO THE LEFT OF
MENU.
6) To turn off the test mode
the
phone must be in regular
mode,
then
follow
the above sequence and scroll
down to where it says
“ DISABLE”
instead of
“ ENABLE” and choose select.
SK TELETEC
Sky All Models Nam
Programming:
Nam Set: #7583538324#626#
Nam Set: *759#364*7388464#
Min simple mode: #
758353266#646#
Irm simple mode #758353266#
476#
Voice memo: #8767#277#
Test Mode: #7583538324#
8378#
A-key: #758353266#2539#
Service Menu: Menu+4+0+Spc
Service Menu: Menu+5+0+Spc
WITHUS / MODOTTEL
Withus wce-100, 200, 300, etc
Nam Programming:
Nam Set: ##948487+Save
Nam Set: ##948482+Save
Nam Set: ##66835+Save
SMS Settings: ##76766
NVM Rebuild: ##777464
HYUNDAI
Hyundai hwp-110 :
Nam Set: #86904**89397#
DM Mode: ##2740*
(Open phone, inter code, close
phone)
Hyundai hgc-120, 130, 200
Nam Programming:
Nam Set: #86904**89397#
Hyundai hgc-310, 600, 610
Nam Set: ##20022002+Pwr
+1+Spc Code
Field Test: ##20022002+Pwr
+1+Master Code
Hyundai Curitel h-100, 150,
hx-510b, 520 Nam
Programming:
Nam Set: ##20022002+Pwr
+1+Spc Code
Field Test: ##20022002+Pwr
+1+Master Code
A-key: 2539**
Debug Menu: ##27732726+Pwr
Sar Test: ##27752345+Pwr
Baud Rate: ##36**+Pwr
DM Mode Enable: **1004+Pwr
DS Mode Enable: **1005+Pwr
Test Bell/Voice/Led/Dot: ##
1122+Pwr
RF Mode: ##2240+Pwr
Ras Ram: ##2774+Pwr
Cmux1: **0481+Pwr
Cmux2: **0482+Pwr
RX Mode Fax: **0492+Pwr
RX Mode Data: **0491+Pwr
RX Mode Reset: **0490+Pwr
HUAWEI
Huawei ETS-668, 678, 688, etc
Nam Programming:
Debug Mode: ##44+Menu
Debug Screen: ##33+Menu
CDG2 Test enable:
##234+Menu
CDG2 Test disable:
##432+Menu
China Lang Select:
##123+Menu
Blocking Debug Code: ###
888+Menu
Home System Only On: ##
461+Menu
Home System Only Off: ##
460+Menu
ERICSSON
Ericsson A1228c, T61, etc Nam
Programming:
Short NAM: 987+Menu
Long NAM: 923885+Menu+Spc
CDMA Mode: 904093+Menu
Analog Mode: 904095+Menu
QNC: 904097+Menu
Debug Screen: 904090+Menu
DM Mode: 904050+Menu
Sony-Ericsson T608 :
Nam Set: 923885, Joystick to
the right, 111111
EPSILON / COMPAL
Epsilon vc-5x :
Nam Set: **147258963##
Programming1: **1232580##
Programming2: **321456987#
#
Version: **1470963##
Debug: **000000##
Menu_1: **078987##
Menu_2: **1234756##
A-key: 2539**
Reset: **14789##
VK MOBILE
VK-100C, 110C, 200C, etc Nam
Programming:
Nam Set: 15314753974159
Test Mode: 153147539123258
(88 – clear efs)
Z510, Z710i(gcd-456) Nam
Programming:
Nam Set: Menu+0+Spc
<>
AMC450 Nam Programming:
Nam Set: *74269#*748#
96148063+SEL
GTRAN
Gtran gcp-2000 Nam
Programming:
Nam Set: 01#737+Spc
Debug Menu: 01#324+Spc
Debug Mode: 01#727
Test Mode: 01#764+Spc
System Test Mode:
01#768+Spc
Gtran gcp-5000 Nam
Programming:
Debug Mode: 01#727+Spc
Test Mode: 01#765
PANASONIC
1) Turn on the phone. Press #
7764726# choose SEND
2) Scroll down to where it says
“ NAM 1? and choose OK.
Scroll
down
to “Access To Level 4? choose
YES. Scroll down to “Built-In-
Monitor”
and choose EDIT.
3) Press 1 and choose OK then
choose BACK. The phone will
say
“ Back To Level 1? choose YES.
Now choose EXIT the phone
will
ask you
“ Exit And Save Change”
choose YES.
4 Signal strength is the top
right number on the screen.
5) To turn off the test mode
follow the above sequence
except press 0
instead of 1 at the “Built-In-
Monitor”
<>
Synertek S200 Nam
Programming:
Nam Set: Menu+0+Spc
Debug Mode:
Test vibro/rx/tx: ##5555+Save
Debug Screen: ##33+Save
Debug Screen: ##523+Save
RF Test: ####+Save
Unknown code: ##325+Save
<>
Sony CM-M1300, 3300, Z200
Nam Programming:
Nam Set: 111111+Ok(Jog Dial)
+Select+Programming+Ok
+Spc
Samsung:
All type of phones (old
modeles):
NAM programming: 47*869#
08#9
Test mode: *759#813580 or
5809540*45680
exit test mode – 02
A-Key: menu + 0, code 25##
_____________________________________
Samsung A500
1. Enter ## and the 6 digit OTKSL
2. SERVICE MENU will appear and 1.Basic will be highlighted
3. Press OK
4. Device will display NAM CDMA/ Phone Number
5. Enter 10 digit MIN
6. Press OK (3 times)
7. Display will return to Service Menu. Press END.
8. Programming is complete
_____________________________________
Samsung N240 and N400
1. Enter ## and type in the 6 digit OTKSL
2. The display will show SVC MENU and 1. Phone Number
3. Press OK
4. Enter the 10 digit MIN and press OK
5. The display will show NAM with Home SID on the second line (Note: SID is no longer used)
6. Press OK
7. The display will return to the SVC MENU
8. Press END to complete the programming
_____________________________________
Samsung Uproar
1. Press MENU key
2. Enter 9 2 0
3. Enter the OTKSL
4. At SVC Menu screen press OK
5. Enter MIN and press OK 4 times
6. Enter SID (4654) and press OK
7. Press END key
8. Programming is complete
_____________________________________
Samsung N300
1. Press ## followed by the OTKSL
2. SVC menu will be displayed
3. Press 1 for Phone #
4. Enter the 10 digit MIN and press OK
5. MIN that was entered will be displayed press OK
6. SVC Menu will display press 3 for NAM
7. Enter the 4 digit Home SID press OK
8. Press END and handset will power cycle
_____________________________________
Samsung i300
1. Tap on the Phone Icon with stylus
2. Press #907*9#0 ENTER LOCK should appear on screen
3. ENTER OTKSL
4. SVC MENU will appear press 1
5. Enter 10 digit MIN and then press SAVE
6. Press SAVE again
7. Press 3 and then press SAVE 6 times
8. Enter the HOME SID and press SAVE once
9. Press END key twice
_____________________________________
Samsung A400 and A460
1. Enter ## and OTKSL
2. Press 1 for Basic at MENU (1 of Phone # when using the MSL)
3. Enter 10 digit MIN and press OK
4. At 1.Basic Menu press the END key
5. Handset will power cycle
_____________________________________
Samsung 3500 8500 6100 N200
1. Press MENU
2. Press 6 0 (3500) 8 2 0 (8500/6100/N200)
3. Enter OTKSL
4. Press 1 at SVC MENU Screen
5. Enter MIN and press OK
6. Press OK 4 times
7. Enter SID (4654) and press OK
8. Press END key
9. Programming is complete
_____________________________________
Qualcomm : QCP-800
programming: menu + 3 + 0.
SPC: “000000? or may be other SPC typed by user.
_____________________________________
QCP-820/1920/2035
type “ 111111? and press Jog Dial.
Choose “Programming” and
enter SPC: “000000? or may be other SPC typed by user.
_____________________________________
QCP 1960 and 2760
1. Press softkey under the work MENU
2. Press 8 0
3. Enter the OTKSL
4. Press softkey for OK
5. Enter MIN and press softkey for OK
6. No SID is require for this handset
7. Press softkey for EXIT
8. Programming is complete
_____________________________________
LG: LGC-300
programming: menu + 9 and enter SPC: “000000? or may be other SPC typed by user
A-Key: press STO for some time while you can see special code enter zone.
Type 2539** and enter A-key
_____________________________________
LGC-330W
programming : menu + 4 + 0 and enter SPC : “ 000000? or may be other SPC typed by user.
A-Key: type 2539** and enter A-key
_____________________________________
LGC-800W /500 programming:
menu + 0 and enter SPC: “ 000000? or may be other SPC typed by user.
A-Key: type 2539** and enter A-key
LGC-510 programming: menu + 3 + 0 and enter SPC: “000000? or may be other SPC typed by user.
A-Key: type 2539** and enter A-key
_____________________________________
LG1010 LG4NE1 TP2200 TP2100 Touchpoint SB/DB TP 1100 TP5200
1. Press ##
2. Enter the OTKSL
3. Scroll to SAVE and press OK
4. Scroll to MIN and press OK
5. Enter 10 digit MIN scroll to SAVE and press OK
6. Scroll to SID and press OK (Skip on 4NE1 go to RESET PHONE and press OK to complete)
7. Enter SID (4654) and scroll to SAVE and press OK
8. Programming is complete
_____________________________________
LG5350
1. Enter ## and enter the OTKSL and press the left soft key under the word “Save”
2. At the Service Program display select Mobile Phone # and press the OK in the center of the 4 way navigation key
3. Enter the 10 digit MIN and press OK
4. Scroll down to 4. Advanced and press OK
5. Scroll to NMSI and press OK
6. Enter the MSID and press OK
7. Scroll down to 9. Amps
Phone # and press OK
8. Enter the MSID and press
OK
9. Press the END key
_____________________________________
TP 2100
1. Press ##
2. Enter OTKSL
3. Scroll to SAVE and press Roller Ball in for OK (ESN will display)
4. Select NEXT (by pressing in the roller ball)
5. Scroll to EDIT and press in the roller ball
6. Enter MIN
7. Scroll to SAVE and press roller ball in
8. Select NEXT at the next 3 screens and then EXIT
9. Programming is complete
_____________________________________
TP3000
1. Press ##
2. Enter OTKSL
3. Scroll to SAVE and press OK
4. Open flip
5. Use Stylus to enter the 10 digit MIN
6. Press OK (No SID entry is required)
7. Programming is complete
_____________________________________
TP 5250
1. Press ##
2. Enter the OTKSL
3. Scroll to SAVE and press OK
4. The phone display will read SVC Program
5. Scroll to MOBILE PHONE # and press OK
6. Phone display will read Mobile Phone Number
7. Enter the 10 digit MIN and press OK
8. Scroll to Home SID and press OK
9. Enter the 4 digit SID (4654) and press OK
10. Reset Phone will be highlighted. Press OK
11. Phone will reset
12. Programming is complete
_____________________________________
LG V111 (DM110) [menu]30.
After ask lockcode, enter : 843691.
_____________________________________
Ericsson:
Programming:
Shot NAM 987 + menu
Long NAM 923885 + menu and
enter SPC: “000000? or may be other SPC typed by user.
CDMA mode 904093 + menu
Analog mode 904095 + menu
DM mode 904959 + menu
_____________________________________
Hyundai : HGC-120E / -130E
programming: #86904**89397#
HGC-600E programming: ##20022002, END and enter SPC:
“ 000000? or may be other SPC typed by user.
_____________________________________
Sony : CM-M1300/3300/Z200
programming: type “111111? and press Jog Dial.
Choose “Programming” and enter SPC: “000000? or may be other SPC typed by user.
_____________________________________
Sony CM-M1300
1. Power phone on
2. Enter six “1s” ( 111111 )
3. Press the jog dial in
4. Press the jog dial in again to select programming
5. Enter six “0s” for the service security code
6. Phone displays the ESN
7. Press the jog dial in for OK
8. Enter your ten digit cellular telephone number
9. Press the jog dial in for OK
10. Enter your cellular carrier ’s system ID (SID) without the zeros (Example: if your carrier’s system ID is 00035, enter just 35)
11. Press the jog dial in for OK
12. Enter a name for NAM 1 or just press the jog dial in for OK
13. Phone displays Basic NAM 1 Programming is complete
14. Press the jog dial in
15. Press the jog dial in again for EXIT
16. Phone powers itself off
17. Press the power button to power the phone back on
18. Basic programming is complete
_____________________________________
Motorola: StarTAC 7760/7860
Service menu: FCN +0+000000+000000+RCL
Test mode: FCN 00**83786633
_____________________________________
STO : V60c programming:
Service menu: 74663 # [Menu] [Menu] (programming code)
Test mode: [Menu] 073887 * (security code = 000000)
_____________________________________
Motorola Tarpon (120x)
1. Press 74663 (spells PHONE)
1. Press # MENU MENU quickly
2. Enter OTKSL
3. The work MIN will be highlighted
4. Select the word CHANGE by selecting the top right button
5. Select DELETE. Press and hold the button until clear
6. Have the customer enter the 10 digit MIN number
7. Select OK with the top right button. The “User Activation” screen will appear
8. Scroll to highlight the CDMA Sys ID
9. Select CHANGE by selecting the top right button
10. Enter SID
11. Select OK by selecting the top right button
12. Select DONE with the top left button
13. Press the END key
14. Press # MENU MENU quickly
15. Enter OTKSL
16. The work MIN will be highlighted
17. Select the word CHANGE by selecting the top right button
18. Select DELETE. Press and hold the button until clear
19. Have the customer enter the 10 digit MIN number
20. Select OK with the top right button. The “User Activation” screen will appear
21. Scroll to highlight the CDMA Sys ID
22. Select CHANGE by selecting the top right button
23. Enter SID
24. Select OK by selecting the top right button
25. Select DONE with the top left button Press the END key
_____________________________________
Motorola Phones (ALL)
1. Enter 74663 # FCN FCN
2. Enter OTKSL
3. Enter MIN and press STO
4. Enter SID (4654) and press STO
5. Press STO again – programming is complete
Note: on the Tarpon (120C) you will need to press the MENU key instead of FCN.
_____________________________________
Nokia : 5185/6185
programming : *3001#12345#
Software version : *#837# or *#VER# or *#9999#
Serial / ESN : *#92772689# or *#WARRANTY#
Phone reset : *#75681# or *# 75682#
_____________________________________
Nokia : 6185-5170
1. Press *#639#
2. Enter OTKSL and press OK
3. Enter the MIN and select OK
4. Enter the SID and select OK
5. Programming is complete
_____________________________________
Nokia : 3585
1. Enter ## followed by the OTKSL
2. Number (MDN) is highlighted. Press the upper left-hand soft key to select
3. Mobile Number will display. Enter the 10 digit MIN
4. Press OK
5. IMSI will appear. Press and hold the Clear key until the display is empty.
6. Enter 31000 plus the MSID (15 digits total)
7. Press the upper left hand soft key and select OK
8. It will take you back to the SVC Programming. Press the upper right hand soft key to select EXIT
9. Press END.
10. Phone will power cycle and programming is complete.
_____________________________________
Neopoint : 1000
1. Press M to display Main Menu
2. Scroll to PREFERENCES
3. Press softkey under SELECT
4. Enter 040793
5. Scroll to PROGRAMMING
6. Press softkey under SELECT
7. Enter OTKSL
8. Press softkey under DONE
9. Scroll to PHONE NUMBER
10. Enter 10 digit MIN
11. Scroll to HOME SID
12. Enter SID (4654)
13. Press softkey under SAVE to exit
14. Programming is complete
_____________________________________
NEOPOINT 1600
1. Power the phone on
2. Press the “Menu” key
3. Scroll to “Preferences” – press “Select”
4. Key in the “Field Service Code” (the phone will not prompt you for the code) at the “preferences” screen to access the “Service” menu (Default code is “000000?)
5. Scroll to “Programming” – press “Select” – the phone will ask for the “Subsidy Lock Code”
6. Enter the “Subsidy Lock Code(654321)” to access the “NAM” menu
7. Select the NAM to be programmed (NAM 1 or NAM 2)
8. Program the NAM – Phone number and CDMA Home SID
9. After programming has been completed press “Save” – the phone will reset
_____________________________________
Handspring TREO:
1. Open the flip and press the PHONEBOOK button one time to display the dial pad
2. Enter ## and the OTKSL using the numbers on the Dial Pad
3. Press the handset button shown in the diagram above
4. At the Activations screen enter the MIN in the phone number field using the numbers on the device keyboard
5. Put a check in the Enable Number Portability box and type the MSID in the MSIN field
6. Press OK
7. The device will display the network search pop-up and return to the Phonebook display
_____________________________________
Hitachi P300:
1. Enter ## and the 6 digit OTKSL
2. Press the Options soft key and then scroll to Save Phone #. Press the OK soft key.
3. At the NAM display scroll to EDIT and press the OK soft key
4. Display will read NAM and MDN will be highlighted. Press the OK soft key.
5. At the MDN display enter the 10 digit MIN and press the SAVE soft key.
6. At the Save prompt press the OK soft key. The next display will show several options that should not edited.
7. Press the EXIT soft key and the device will power cycle.
8. Programming is complete.
_____________________________________
Sanyo 4000 4500 4700 5000
6000
1. Press ##
2. Enter the OTKSL
3. Scroll to SAVE and press OK
4. ESN will be displayed – press OK
5. Enter 10 digit MIN and press OK
6. Enter SID (4654) and press OK
7. Press OK twice
8. Programming is complete
_____________________________________
Sanyo 5150 5300 and 6400
1. Enter ## followed by the OTKSL
2. Press MENU SAVE PHONE #
3. Press Ok
4. SVC Programming will be displayed. Scroll and highlight Mobile Number. Press OK
5. Press OK again
6. ESN will be displayed. Press OK
7. Mobile Number will be displayed enter the 10 digit MIN press OK
8. Press OK 4 times
9. Phone will power cycle
10. Programming is complete
_____________________________________
Sanyo 6000
1. Press ##
2. Enter OTKSL
3. Press MENU Key and scroll to SAVE PHONE # and press OK
4. ESN will be displayed press OK
5. Enter MIN and press OK
6. Enter SID and press OK
7. Press OK twice more
8. Programming is complete
_____________________________________
Sanyo 4900
1. Enter ## followed by the 6 digit OTKSL
2. Press the MENU/OK key and scroll and highlight SAVE PHONE #
3. Press MENU/OK
4. Scroll and highlight MOBILE NUMBER press OK
5. At the ESN display press OK
6. In the MOBILE NUMBER screen enter your MIN and press OK 4 times
7. At the service program menu scroll to exit and press the MENU/OK key.
8. Programming is complete
_____________________________________
Sanyo 6200
1. Enter ##
2. Enter OTKSL
3. Press the MENU key and scroll to highlight SAVE PHONE #
4. Press OK
5. Scroll and highlight MOBILE NUMBER
6. Press OK twice
7. Scroll and highlight EXIT
8. Press OK
9. Phone will power cycle
10. Programming is complete
_____________________________________
Toshiba 2032P
1. Slide the Radio Standby Switch on the left side of the device to the upper side (ON) to activate the phone function. This is the switch with the phone icon over it
2. After power up is completed use the stylus to tap on the ADMIN pull up menu at the bottom of the screen and select ACTIVATION WIZARD. If your device has not yet been activated the ACTIVATION WIZARD will automatically start when you turn on the radio in your device.
3. Tap NEXT 3 times. If the device has been previously activated it will require only 2 presses.
4. On the fourth screen enter the 6 digit OTKSL using keyboard
5. Enter the MIN in both entery fields then tap NEXT
6. Wait for the device to initialize and display “ready to connect”
7. To initiate IOTA tap the word ADMIN at the bottom of the display and then Data Provisioning
8. Programming is complete ******* Here is a list of various codes to try out.
Some may require an MSL to be able to make full use of the functionality.
##2769737 [##BROWSER] – MiniBrowser Settings (2G)
##8626337 [##VOCODER] – Set Vocoder
##3282 [##DATA] – Setup Menu for Vision handsets
##8463 [##TIME] – Airtime Menu
##040793 – Debug Menu
##786 [##RUN] – Technical Information (be careful with this one, you can reset the handset)
##932 [##WEB] – IP Address information (2G)
##889 [##TTY] – TTY On or TTY Off
##4357 [##HELP] – Help
_____________________________________
alcatel
Master Codes
- 25228352
- 25228353
- 83227423 (TH3/4,BH4,BF5,BG3,BF3/4..)
###337*07# – master reset (with SIM)
###847# – factory reset (with SIM)
_____________________________________
Alcatel 835
formating – **0102#
_____________________________________
mitsubishi
*#987*00# – Service menu
*#987*99# – Full reset
*#900# – SW version
_____________________________________
fly bird S688
– #*301#02# send – with SIM
menu : 7 – 10 – ok,
#*8000#, #*3676# (reboot repair)
V09, S1180
– *, 3 times down, 3 times up
_____________________________________
huawai
MASTER SECURITY CODE
-309296
-3092
-9296
_____________________________________
maxon
*#9922# – menu, reset (without SIM)
*#9900# – Software Version
*#9901# – Software Version (PBatch)
_____________________________________
mitsubishi
hold * 476989 NS Lock Menu
hold * 482896 CP Lock Menu
hold * 574243 NS Lock Menu
hold * 967678 SP Lock Menu
hold * 362628 IMSI Lock Menu
hold * 787090 Lock net.level
hold * 787292 Lock net.level
hold * 3926 Shut Down
Hardware komputer

Hardware Problems
• • • • Understanding the hardware
Computer hardware is the physical part of a computer or system equipment used to perform computer functions. Development of electronic technology of the most rapidly and widely used in many fields in completing the work or to get information is nothing but the computer. Development of the computer is caused by the development of the microprocessor (processor) as the brain in dealing with the whole of the working computer.
In summary then the computer system consists of three main parts, namely:
A. CPU (Central Processing Unit) / Processor
2. Memory (RAM and ROM)
3. Input / Output
• •Mother Board
• Definition of Motherboard
Mother Board is a board / mother board or a board game where all the devices installed starting from the processor, memory, expansion slots, etc.. Main board is not less important to the processor. If we let in humans, the Main board is a series of blood vessels and nerves at the computer. Main board is not good, will not result in maximal performance of other peripherals. Therefore, the selection of an appropriate main board will greatly affect computer performance.
• How a Motherboard
In computer systems, peripherals, peripherals connected to each other on the main board and can continue instruction through channels on the board. Throughout the connected peripherals will be a complete computer system. While the main board functions in general is to channel the flow of input and data flows needed in the course of the process on the computer.
• North bridge and South bridge
The main chips on the main board there are two, namely the North bridge and South bridge. North bridge is the bridging function of the flow of data around main memory and processor power management and organize work. While the work function of South bridge is set such peripheral peripheral-IDE Controller, PCI bus, AGP, and the function I / O other.
• BIOS
In some main board chips EPROM which contains the basic operating system BIOS (Basic Input / Output System). This BIOS function is to conduct Hardware Bootstrap and Initialization at boot time.
• I / O Ports
I / O (Input / Output) ports are part of the main board to interact with the user via the media peripheral I / O such as keyboard, mouse, printer, and so forth. Most motherboards today have always had an interface PS / 2, USB, LPT, PCI, and Serial. All these ports are chose characteristics and functions of its own. The point is to allow a user to interact with the computer in doing such jobs.
That must be considered in selecting or assembling Mother Board is that every motherboard has different specifications for each brand or type, among others:
A. Each motherboard has a pair with a particular processor, the type of socket or slot is available to the processor.
2. Motherboard ability to be in the up-grade to the number of processor speed. Motherboards are generally able to up-grade to replace the processor. Information on this is very important to purchase a motherboard with consideration to be on the up-grade.
3. RAM memory capacity that can be installed on the motherboard of the larger memory capacity provided more favorable.
4. Slots available for each type of RAM, for example, how many slots are provided for EDO RAM, SD RAM, etc..
5. Setting the motherboard BIOS (software) or a jumper setting.
6. The number of slots for PCI and ISA. Slots are very useful for adding peripherals such as audio card.
7. Does the motherboard support for the VGA card for AGP, AGP support will be more profitable to stock if desired improved graphics capabilities of the computer by installing an AGP card.
8. Bus speed up to speed for how much memory (66, 100, 133, 200, 400 Mhz)
9. Is the VGA card and audio card is on board or not.
10. Power Supply for ATX Mother Board or Baby AT or AT. Several types of slot or socket for the processor include:
a. Slot 1
Mother Board is created to support Processor P-III and Celeron.
b. Slot 2
The motherboard is designed to support the P-II Processor and Xeon 9.
c. Socket 7
The motherboard is designed to support the AMD K6-2 processor, AMD K6-3 and Cyrix M-II and Pentium MMX.
d. Slot A
The motherboard is designed to support AMD Athlon, AMD Thunder bird.
e. Socket A
The motherboard is designed to support the AMD Athlon and AMD Duron.
f. Socket 370
The motherboard is designed to support Intel Pentium-III (Tualatin and Coppermine) / Celeron TM
g. Socket 8
Motherboards are made to support Pentium II and Pentium-Pro.
h. Socket 423
Motherboards are made to support Pentium-IV.
Central Processing Unit / Processor .....
• • • • Definition Processor
The main part of the computer because the processor serves to regulate all activities that exist on the computer. Speed of the processor unit is MHz (Mega Hertz) or GHz (1000 megahertz), where the greater the value the faster the process of execution on the computer. Processor can we as the brain of the computer analogy. Hardware functions to do all kinds of processes in a computer system. So that the processor will determine the speed and performance of computer systems.
Monday, March 14, 2011
Japanese nuclear
Tokyo (CNN) -- Another reactor at Japan's Fukushima Daiichi nuclear plant lost its cooling capabilities Monday, a government official said.
The problem was detected in the plant's No. 2 reactor Monday afternoon after an explosion rocked the building containing the plant's No. 3 reactor, Chief Cabinet Secretary Yukio Edano told reporters.
"We think that the hydrogen explosion in (the building housing) reactor No. 3 caused the cooling system of reactor No. 2 to stop working," Edano said.
Water levels were falling and pressure was building up inside the No. 2 reactor, he said, and officials were working on a plan to release gas and also inject seawater into that reactor.
Officials: Radiation leak 'unlikely'
Nuclear expert talks to CNN
Physicist: 'Wide range' of possibilities
Explainer: Producing nuclear energy
Workers have been injecting seawater in a last-ditch effort to cool down fuel rods and prevent a full meltdown at two other reactors at the plant -- No. 1 and No. 3 -- after an 8.9-magnitude earthquake and ensuing tsunami Friday knocked out the reactors' cooling systems.
There are six reactors at Tokyo Electric Power Company's Fukushima Daiichi plant, located in northeastern Japan about 65 km (40 miles) south of Sendai.
A buildup of hydrogen in the Fukushima Daiichi plant's No. 3 reactor building caused the blast, authorities said, which injured 11 people and sent white smoke billowing above the nuclear plant.
But the explosion did not damage the reactor or result in significant radiation leakage, Edano told reporters.
The explosion blew away the roof and walls of the building housing the reactor, Japan's Kyodo News reported. A similar blast occurred Saturday at the plant's No. 1 reactor.
On Sunday, Edano warned that the same sort of explosion could occur in the No. 3 building.
After Monday's blast, authorities ordered at least 500 residents remaining within 20 kilometers (12 miles) of the plant to stay inside, Edano said. About 200,000 people evacuated the area over the weekend after a government order.
"There is no massive radioactive leakage," Edano said.
Even so, public concern over the possibility remained rampant Monday -- even outside the evacuation zone.
"Everyone is talking about it. There seems to be a real fear about this, an anxiety about it," said CNN's Dr. Sanjay Gupta, reporting from a school serving as an evacuation center about 100 kilometers (62 miles) away from the Fukushima Daiichi plant.
Low levels of radiation were detected at least as far as 100 miles northeast of the plant, according to the U.S. Navy, which repositioned ships and planes after detecting low-level "airborne radioactivity."
Nuclear expert: This is no Chernobyl
Anatomy of a meltdown
Radioactive leak? What to do
Japan's nuclear worries
The Navy's statement, however, provided some perspective, noting that the maximum potential radiation dose received by any ship personnel when it passed through the area was "less than the radiation exposure received from about one month of exposure to natural background radiation from sources such as rocks, soil, and the sun."
Japanese officials have said that they are operating under the presumption that there may be a partial meltdown in the No. 3 and No. 1 nuclear reactors at the Daiichi plant. Authorities have not yet been able to confirm a meltdown, because it is too hot inside the affected reactors to check.
The Tokyo Electric Power Company, which runs the plant, said in a news release late Sunday that radiation levels outside that plant remained high.
Kyodo, citing the same company, said that there were measurements of 751 microsieverts and 650 microsieverts of radiation early Monday. Both are above the legal limit, albeit less than one reading recorded Sunday.
A microsievert is an internationally recognized unit measuring radiation dosage, with people typically exposed during an entire year to a total of about 1,000 microsieverts.
Authorities early Sunday noted high radiation levels at another plant, located 135 kilometers (85 miles) away in Onagawa. The International Atomic Energy Agency later said that Japanese officials reported that levels had returned to "normal." It also said the increase detected earlier "may have been due to a release of radioactive material from the Fukushima Daiichi nuclear power plant."
Most experts aren't expecting a reprise of the 1986 Chernobyl meltdown, which killed 32 plant workers and firefighters in the former Soviet Union and at least 4,000 others from cancers tied to radioactive material released by the plant.
Analysts said Japan's crisis is unique.
"This is unprecedented," said Stephanie Cooke, the author of "In Mortal Hands: A Cautionary History of the Nuclear Age." "You've never had a situation with multiple reactors at risk."
Japan's 54 nuclear reactors provide about 30% of the country's electricity, according to the World Nuclear Association.
Japan's nuclear worries
Fears of spreading radiation
Reporter tells her story
Chaos as quake hits
RELATED TOPICS
* Japan
* Nuclear Energy
* Earthquakes
* Tsunamis
* U.S. Geological Survey
Daiichi's No. 1 reactor -- the oldest of six boiling-water units at the site, according to the nuclear association -- began commercial operation in March 1971. The No. 2 reactor began commercial operation in 1974, and the No. 3 reactor followed two years later.
"Nuclear facilities in Japan ... were built to withstand earthquakes -- but not an 8.9 earthquake," said James Walsh, a CNN contributor and research associate at MIT's security studies program.
The crisis has stoked fears of a full-on nuclear meltdown, a catastrophic failure of the reactor core that has the potential for widespread release of radiation.
Officials are working to prevent such a calamity by injecting seawater and boron into the affected reactors -- even though salt and boron will corrode the reactors, rendering the Daiichi plant inoperable.
"Essentially, they are waving the white flag and saying, 'This plant is done,'" Walsh said. "This is a last-ditch mechanism to try to prevent overheating and to prevent a partial or full meltdown."
The situation -- part of what Prime Minister Naoto Kan called the "toughest and most difficult crisis for Japan" since the end of World War II -- has national and global repercussions as authorities and scientists debate the dangers of nuclear power.
Cooke said that it may take years to fully assess the damage at Japan's worst-hit reactors, much less to get them working again. And authorities may never definitively determine how much radiation was emitted, or how many got sick because of it.
If the effort to cool the nuclear fuel inside the reactor fails completely -- a scenario that experts who have spoken to CNN say is unlikely -- radiation could be released into the atmosphere or water. That could lead to widespread cancer and other health problems, experts say.
Authorities have downplayed such a scenario, insisting the situation appears under control and that radiation levels in the air are not dangerous.
The Daiichi plant has a containment vessel, which theoretically would capture radioactive material if a full meltdown occurs.
Edano has said there have been no leaks of radioactive material at any plants. Radioactive steam has been released intentionally to lessen growing pressure in the two Daiichi reactors -- in an amount authorities have described as minimal.
Monitoring of the Daiichi plant has detected several signs that at least a partial meltdown may be occurring, according to Japan's nuclear safety agency, including high levels of hydrogen inside reactor buildings and radioactive cesium detected outside the plant. This could be caused by the melting of fuel rods inside the reactor, experts said.
Despite such evidence, Noriyuki Shikata, a spokesman for Japan's prime minister, said Sunday that he would not describe what was occurring in the reactors as a "meltdown," adding that the situation was "under control."
But Cooke, also editor of Nuclear Intelligence Weekly for the atomic-energy community, said she's not convinced.
"The more they say they're in control, the more I sense things may be out of control," she said.
Saturday, March 12, 2011
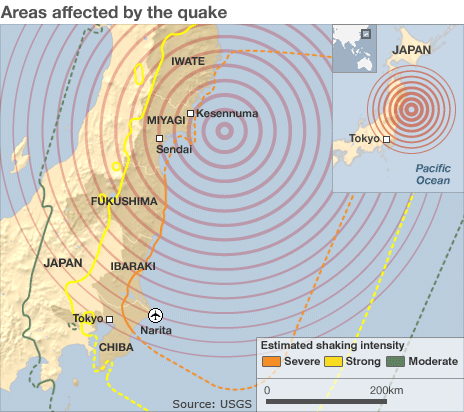
Japan's most powerful earthquake since records began has struck the north-east coast, triggering a massive tsunami.
Cars, ships and buildings were swept away by a wall of water after the 8.9-magnitude tremor, which struck about 400km (250 miles) north-east of Tokyo.
A state of emergency has been declared at a nuclear power plant, where pressure has exceeded normal levels.
Officials say 350 people are dead and about 500 missing, but it is feared the final death toll will be much higher.
In one ward alone in Sendai, a port city in Miyagi prefecture, 200 to 300 bodies were found.
The quake was the fifth-largest in the world since 1900 and nearly 8,000 times stronger than the one which devastated Christchurch, New Zealand, last month, said scientists.
Thousands of people living near the Fukushima nuclear power plant have been ordered to evacuate.
Japanese nuclear officials said pressure inside a boiling water reactor at the plant was running much higher than normal after the cooling system failed.
Officials said they might need to deliberately release some radioactive steam to relieve pressure, but that there would be no health risk.
US Secretary of State Hillary Clinton had earlier said the US Air Force had flown emergency coolant to the site.
But US officials later said no coolant had been handed over because the Japanese had decided to handle the situation themselves.
The UN's nuclear agency said four nuclear power plants had shut down safely.
Measured at 8.9 by the US Geological Survey, it struck at 1446 local time (0546 GMT) at a depth of about 24km.

The tsunami rolled across the Pacific at 800km/h (500mph) - as fast as a jetliner - before hitting Hawaii and the US West Coast, but there were no reports of major damage from those regions.
Thousands of people were ordered to evacuate coastal areas in the states of California, Oregon and Washington.
The biggest waves of more than 6-7ft (about 2m) were recorded near California's Crescent City, said the Pacific Tsunami Warning Centre.
A tsunami warning extended across the Pacific to North and South America, where many other coastal regions were evacuated, but the alert was later lifted in most parts, including the Philippines, Australia and China.
Strong waves hit Japan's Miyagi and Fukushima prefectures, damaging dozens of coastal communities.
A 10m wave struck Sendai, deluging farmland and sweeping cars across the airport's runway. Fires broke out in the centre of the city.

Japan's NHK television showed a massive surge of debris-filled water reaching far inland, consuming houses, cars and ships.
Motorists could be seen trying to speed away from the wall of water.
Start Quote
In other developments:
Four trains are missing along the coast, says Japan Railways; and a ship carrying 100 people was swept away
Fire has engulfed swathes of the coast in Miyagi prefecture's Kesennuma city, one-third of which is reportedly under water
A major explosion hit a petrochemical plant in Sendai; further south a huge blaze swept an oil refinery in Ichihara city, Chiba prefecture
Some 1,800 homes are reported to have been destroyed in the city of Minamisoma, Fukushima prefecture
A dam burst in north-eastern Fukushima prefecture, sweeping away homes, Kyodo news agency reports
At least 20 people were injured in Tokyo when the roof of a hall collapsed on to a graduation ceremony
In a televised address, Prime Minister Naoto Kan extended his sympathy to the victims of the disaster.
As aftershocks rattled the country, residents and workers in Tokyo rushed outside to gather in parks and open spaces.
Many people in the Japanese capital said they had never felt such a powerful earthquake.
In central Tokyo, a number of office workers are spending the night in their offices because the lifts have stopped working.
"This is the kind of earthquake that hits once every 100 years," said restaurant worker Akira Tanaka.
Train services were suspended, stranding millions of commuters in the Japanese capital.
About four million homes in and around Tokyo suffered power cuts.
Cars, ships and buildings were swept away by a wall of water after the 8.9-magnitude tremor, which struck about 400km (250 miles) north-east of Tokyo.
A state of emergency has been declared at a nuclear power plant, where pressure has exceeded normal levels.
Officials say 350 people are dead and about 500 missing, but it is feared the final death toll will be much higher.
In one ward alone in Sendai, a port city in Miyagi prefecture, 200 to 300 bodies were found.
The quake was the fifth-largest in the world since 1900 and nearly 8,000 times stronger than the one which devastated Christchurch, New Zealand, last month, said scientists.
Thousands of people living near the Fukushima nuclear power plant have been ordered to evacuate.
Japanese nuclear officials said pressure inside a boiling water reactor at the plant was running much higher than normal after the cooling system failed.
Officials said they might need to deliberately release some radioactive steam to relieve pressure, but that there would be no health risk.
US Secretary of State Hillary Clinton had earlier said the US Air Force had flown emergency coolant to the site.
But US officials later said no coolant had been handed over because the Japanese had decided to handle the situation themselves.
The UN's nuclear agency said four nuclear power plants had shut down safely.
Measured at 8.9 by the US Geological Survey, it struck at 1446 local time (0546 GMT) at a depth of about 24km.

The tsunami rolled across the Pacific at 800km/h (500mph) - as fast as a jetliner - before hitting Hawaii and the US West Coast, but there were no reports of major damage from those regions.
Thousands of people were ordered to evacuate coastal areas in the states of California, Oregon and Washington.
The biggest waves of more than 6-7ft (about 2m) were recorded near California's Crescent City, said the Pacific Tsunami Warning Centre.
A tsunami warning extended across the Pacific to North and South America, where many other coastal regions were evacuated, but the alert was later lifted in most parts, including the Philippines, Australia and China.
Strong waves hit Japan's Miyagi and Fukushima prefectures, damaging dozens of coastal communities.
A 10m wave struck Sendai, deluging farmland and sweeping cars across the airport's runway. Fires broke out in the centre of the city.
Japan's NHK television showed a massive surge of debris-filled water reaching far inland, consuming houses, cars and ships.
Motorists could be seen trying to speed away from the wall of water.
Start Quote
In other developments:
Four trains are missing along the coast, says Japan Railways; and a ship carrying 100 people was swept away
Fire has engulfed swathes of the coast in Miyagi prefecture's Kesennuma city, one-third of which is reportedly under water
A major explosion hit a petrochemical plant in Sendai; further south a huge blaze swept an oil refinery in Ichihara city, Chiba prefecture
Some 1,800 homes are reported to have been destroyed in the city of Minamisoma, Fukushima prefecture
A dam burst in north-eastern Fukushima prefecture, sweeping away homes, Kyodo news agency reports
At least 20 people were injured in Tokyo when the roof of a hall collapsed on to a graduation ceremony
In a televised address, Prime Minister Naoto Kan extended his sympathy to the victims of the disaster.
As aftershocks rattled the country, residents and workers in Tokyo rushed outside to gather in parks and open spaces.
Many people in the Japanese capital said they had never felt such a powerful earthquake.
In central Tokyo, a number of office workers are spending the night in their offices because the lifts have stopped working.
"This is the kind of earthquake that hits once every 100 years," said restaurant worker Akira Tanaka.
Train services were suspended, stranding millions of commuters in the Japanese capital.
About four million homes in and around Tokyo suffered power cuts.
Wednesday, March 9, 2011
Setting internet untuk IM3, Telkomsel, Mentari, XL
Anda bisa masuk ke menu browser, kemudian pilih setting, lalu ikuti pengaturan manual GPRS. Atau sebelum melakukan setting manual, ada baiknya Anda coba melakukan setting OTA dengan mengirimkan SMS sesuai petunjuk masing-masing operator.
MATRIX GPRS
Setting OTA:
Kirim SMS ke888 dengan pesan :
ACT[spasi]GPRS
MENTARI GPRS
Setting OTA via SMS ;
Kirim SMS ke3000 dengan pesan :
Ketik : GPRS[spasi] merk HP[spasi] tipe HP
Setting Manual :
Indosat GPRS
Profile Name : INDOSATGPRS
Homepage URL : http://wap.klub-mentari.com
IP Address : 10.19.19.19
Bearer : GPRS
User Name : indosat
Password : indosat
APN : indosatgprs
Indosat MMS
Profile Name : INDOSATGPRS
Homepage URL : http://mmsc.indosat.com
IP Address : 10.19.19.19:8080
Bearer : GPRS
User Name : indosat
Password : indosat
APN : indosatmms
IM3 GPRS
Setting OTA via SMS ;
Kirim SMS ke3939 dengan pesan :
Ketik : GPRS[spasi] merk HP[spasi] tipe HP
Setting Manual :
IM3 GPRS
Connection name : M3-GPRS
Access point name : www.indosat-m3.net
User name : gprs
Password : im3
Authentication : Normal
Homepage : http://wap.indosat-m3.net
IP address : 010.019.019.019
Port : 9201 (standard), 8080 (proxy)
IM3 MMS
Connection name : M3-MMS
Access point name : indosatmms
User name : indosatmms
Password : indosatmms
Authentication : Normal
Homepage : http://mmsc.indosat-m3.net
IP address : 010.019.019.019
Port : 9201 (standard), 8080 (proxy)
TELKOMSEL GPRS
KARTU HALLO
Kirim SMS ke 6616 dengan pesan :
Ketik : GPRS
KARTU SIMPATI/KARTU AS
Kirim SMS ke 6616 dengan pesan :
Ketik : GPRS[spasi]angka dibelakang simcard Anda (Nomor ICCID/Integrated Circuit Card Identification)
Kemudian tunggu beberapa saat, Anda akan mendapat SMS konfirmasi bahwa aplikasi GPRS sedang diproses. Waktu yang dibutuhkan sekitar 48 jam. Setelah GPRS aktif, Anda akan mendapat notifikasi SMS lagi yang menyatakan GPRS sudah aktif.
Setting Manual :
Telkomsel GPRS
Profile Name : TSEL GPRS
APN : Telkomsel
User name : wap
Password : wap123
Authentication : Normal
Gateway IP address : 10.1.89.130
Homepage : http://wap.telkomsel.com
Data Bearer : GPRS
Proxy port number : 9201 atau 8000
Telkomsel MMS
Connection Name: tel-MMS
Data Bearer: GPRS
Access Point Name: mms
Username: wap
Prompt Password: No
Password: wap123
Authentication: Normal
Proxy address: 10.1.89.150
Homepage: http://mms.telkomsel.com/
Connection Security: Off
XL GPRS/MMS
Setting OTA via SMS ;
Ketik SMS dengan isi : GPRS[spasi][spasi] Kirim ke 9667
Ketik SMS dengan isi : MMS[spasi][spasi] Kirin ke 9667
Setting Manual :
XL GPRS
Connection Name: XL-GPRS
Data Bearer: GPRS
Access Point Name: www.xlgprs.net
Username: xlgprs
Prompt Password: No
Password: proxl
Authentication: Normal
Homepage: http://wap.lifeinhand.com
Connection Security: Off
Session Mode: Permanent
IP Address: Automatic
Proxy Server Address: 202.152.240.050
Proxy Port Number: 8080
XL MMS
Connection Name: XL-MMS
Data Bearer: GPRS
Access Point Name: www.xlmms.net
Username: xlgprs
Prompt Password: No
Password: proxl
Authentication: Normal
Homepage: http://mmc.xl.net.id/servlets/mms
Connection Security: Off
Session Mode: Permanent
IP Address: Automatic
Proxy Server Address: 202.152.240.050
Proxy Port Number: 8080
3 (THREE)
Setting Manual :
GPRS
Settings’ Name: 3-GPRS
Homepage : http://wap.three.co.id/
Proxies : Enable
Proxy address : 10.4.0.10
Port : 3128
GPRS access point : 3gprs
Authentication type : Normal
Login type : Automatic
Username : 3gprs
Password : 3gprs
3 (THREE) MMS
Settings’ name : 3-MMS
Homepage : http://mms.hutch.co.id/
GPRS access point : 3mms
Authentication type : Normal
Username : 3mms
Password : 3mms
Allow adverts : No
AXIS
Parameter Umum GPRS
Connection Name : AXIS
Data Bearer : GPRS atau PS
Access Point Name (APN) : AXIS
Username : AXIS
Prompt Password : No
Password : 123456
Authentication : Normal
Gateway/Proxy IP Address : 10.8.3.8
Gateway/Proxy Port : 9201 atau 8080
Homepage : http://wap.axisworld.co.id
Connection Security : Off
Session Mode : Permanent
Axis MMS
Connection Name : AXISmms
Data Bearer : GPRS atau PS
Access Point Name (APN) : AXISmms
Username : AXIS
Prompt Password : No
Password : 123456
Authentication : Normal
Gateway/Proxy IP Address : 10.8.3.8
Gateway/Proxy Port : 9201 atau 8080
Homepage / MMS Server : http://mmsc.AXIS
Connection Security : Off
Session Mode : Permanent
Sunday, March 6, 2011
bahan pembelajaran multimedia
Menurut Luther (1994), pengembangan multimedia dilakukan melalui 6 tahapan, yaitu: konsep, disain, pengumpulan material, pembuatan (assemby), testing, dan distribusi.
Tahap 1 ( Konsep ):
Menentukan tujuan yang meliputi:
• Tujuan Aplikasi (informasi, hiburan, pelatihan, dan lain-lain)
• Identifikasi Pengguna (Users)
• Bentuk Aplikasi (presentasi, interaktif, dan lain-lain)
• Spesifikasi Umum (ukuran aplikasi, dasar perancangan, target yang ingin dicapai, dan lain-lain)

Tahap 2 ( Disain ):
Disain (perancangan) adalah membuat spasifikasi secara rinci mengenai struktur aplikasi multimedia yang akan dibuat, gaya dan kebutuhan bahan (material) untuk aplikasi.
Spesifikasi dibuat cukup rinci sehingga pada tahap berikutnya, yaitu tahap pengumpulan bahan dan pembuatan tidak dibutuhkan keputusan baru, melainkan menggunakan apa yang telah ditetapkan pada tahap disain. Namun demikian, sering terjadi penambahan atau pengurangan bahan, bahkan ada perubahan pada bagian aplikasi pada awal pengerjaan multimedia.
Tahap disain multimedia sering melibatkan kegiatan:
• Pembuatan Bagan Alir (Flow Chart), yaitu menggambarkan struktur aplikasi multimedia yang disarankan.
• Pembuatan Storyboard, yaitu pemetaan elemen-elemen atau bahan (material) multimedia pada setiap layar aplikasi multimedia.
Cara menentukan urutan atau hubungan dalam merancang Bagan Alir (Flow Chart) atau Peta Konsep:
• Ikuti hirarki alami materi.
• Berdasarkan minat pengguna.
• Dari yang sudah dikenal sampai yang belum dikenal.
• Dari yang konkret sampai yang abstrak.
• Dari yang umum sampai yang spesifik.
• Berdasarkan pertimbangan topik pembahasan.
• Secara kronologis didasarkan pada pemakaian atau kinerja.
Hal-hal yang perlu diperhatikan ketika mengembangkan bagan alir meliputi:
• Apakah semua bidang isi yang dibutuhkan telah dimasukkan ?
• Apakah semua hubungan di antara modul telah dimasukkan ?
• Apakah maksud struktur akan menjadi jelas bagi tim pengembang dan pengguna ?
Bagan Alir digambarkan menggunakan simbol-simbol bagan alir pemrograman atau dengan simbol yang ditentukan sendiri.

Storyboard digunakan untuk:
• Memungkinkan tim dan klien (pengguna) memeriksa, menyetujui, dan meningkatkan rancangan.
• Menjadi panduan bagi programmer dan graphics designer.
• Mengetahui elemen (material) multimedia yang dipakai.
• Menjaga konsistensi di sepanjang aplikasi multimedia.
• Memungkinkan rancangan diimplentasikan pada platform yang berbeda, karena storyboard bersifat platform independent.
Storyboard perlu mengandung:
• Nama aplikasi (program) atau modul dan nomor halaman atau nomor layar.
• Gambar sketsa layar atau halaman beserta rincian objek-objek yang ada pada layar, meliputi: Teks, Gambar, Animasi, Audio, Narasi, Video, Warna, penempatan, ukuran gambar, jika penting, Warna dan font dari teks.
• Interaksi: pencabangan dan aksi-aksi lainnya (tombol).
Yang perlu diperhatikan dalam membuat storyboard:
• Storyboard dapat digambar dengan tangan, tidak perlu bagus dilihat asalkan cukup jelas sebagai panduan bagi anggota tim proyek lainnya.
• Tersedia storyboard untuk setiap layar atau halaman.
• Semua rincian yang penting harus ditunjukkan.
• Teks dan narasi dapat sangat panjang, karena itu boleh ditulis pada lembar terpisah (script document) asalkan disertai dengan nomor layar storyboard yang jelas.
• Setiap anggota tim produksi mempunyai salinan storyboard atau dapat mengakses storyboard dengan mudah.
Perancangan Antarmuka Pemakai:
• Graphics Designer merancang antarmuka pemakai berdasarkan storyboard.
• Antarmuka pemakai harus:Menggapai “look and feel” dari organisasi klien, Memproyeksikan “mood” yang sesuai bagai pemakai, Tidak boleh lebih kuat daripada pesan yang ingin disampaikan, tetapi harus mendukung pesannya.
Hal-hal yang perlu diperhatikan dalam perancangan antar pemakai:
• Metafora yang digunakan.
• Estetika
• Navigasi
• Piranti interaksi yang digunakan.
• Tata letak, warna, font.
• Kendali (tombol-tombol): penempatannya, ukurannya, dan bagaimana pengguna tahu tombol dapat dipilih atau telah dipilih.
• Bilamana kursor berubah bentuk.
Tahap 3 ( Pengumpulan Material ):
• Melakukan pengumpulan bahan (material) seperti: clipart, image, animasi, audio, berikut pembuatan grafik, foto, audio, dan lain-lain yang diperlukan untuk tahap berikutnya.
• Bahan yang diperlukan dalam multimedia dapat diperoleh dari sumber-sumber seperti: library, bahan yang sudah ada pada pihak lain, atau pembuatan khusus yang dilakukan oleh pihak luar.
• Pengumpulan material dapat dilakukan paralel dengan tahap pembuatan (assemby).
Tahap 4 ( Pembuatan ):
• Tahap pembuatan (assembly) merupakan tahap dimana seluruh objek multimedia dibuat atau diintegrasikan.
• Pembuatan aplikasi berdasarkan flow chart, storyboart, struktur navigasi atau diagram objek yang berasal dari tahap disain.
• Dapat menggunakan perangkat lunak authoring yang mempunyai fitur pembuatan flow chart dan disain, misal: Microsoft Frontpage, Macromedia, dan lain-lain.
Tahap 5 ( Testing ):
• Tahap testing dilakukan setelah tahap pembuatan dan seluruh bahan (material) telah dimasukkan.
• Biasanya pada tahap awal dilakukan testing secara modular untuk memastikan apakah hasilnya seperti yang diinginkan.
• Aplikasi yang telah dihasilkan harus dapat berjalan dengan baik di lingkungan pengguna (klien), dimana pengguna dapat merasakan adanya kemudahan dan manfaat dari aplikasi tersebut serta dapat menjalankan sendiri terutama untuk aplikasi yang interaktif.
Tahap 6 ( Distribusi ):
• Bila aplikasi multimedia akan digunakan dengan mesin yang berbeda, penggandaan menggunakan floppy disk, CD-ROM, tape, atau distribusi dengan jaringan sangat diperlukan.
• Tahap distribusi juga merupakan tahap evaluasi terhadap suatu produk multimedia, diharapkan akan dapat dikembangkan sistem multimedia yang lebih baik di kemudian hari.
Saturday, March 5, 2011


Subscribe to:
Posts (Atom)